The short answer: start with the farm loop
Minecraft barn ideas work best when the building answers a simple question: what do you do here every time you visit the farm? Put the main doors on the path, keep the animal stalls close to food and water, and leave a clear route from the yard to storage. A beautiful front elevation cannot rescue a barn that makes you walk through three pens to reach a chest.
For most survival farms, start with a 9×13 or 11×15 footprint. Use an odd width so the central aisle stays balanced, reserve one end for hay or barrels, and leave a little outdoor space for a paddock. Then choose one dominant wood, one roof color and one foundation material. The result feels more like a working farm than a decorated box.
The ten ideas in this guide are variations on that system: compact animal barns, long aisle barns, horse stables, hillside barns, split-level storage barns and larger farmyard anchors. You can shrink the footprint without losing the logic by keeping the door, aisle, stall depth and service corner in the same order.
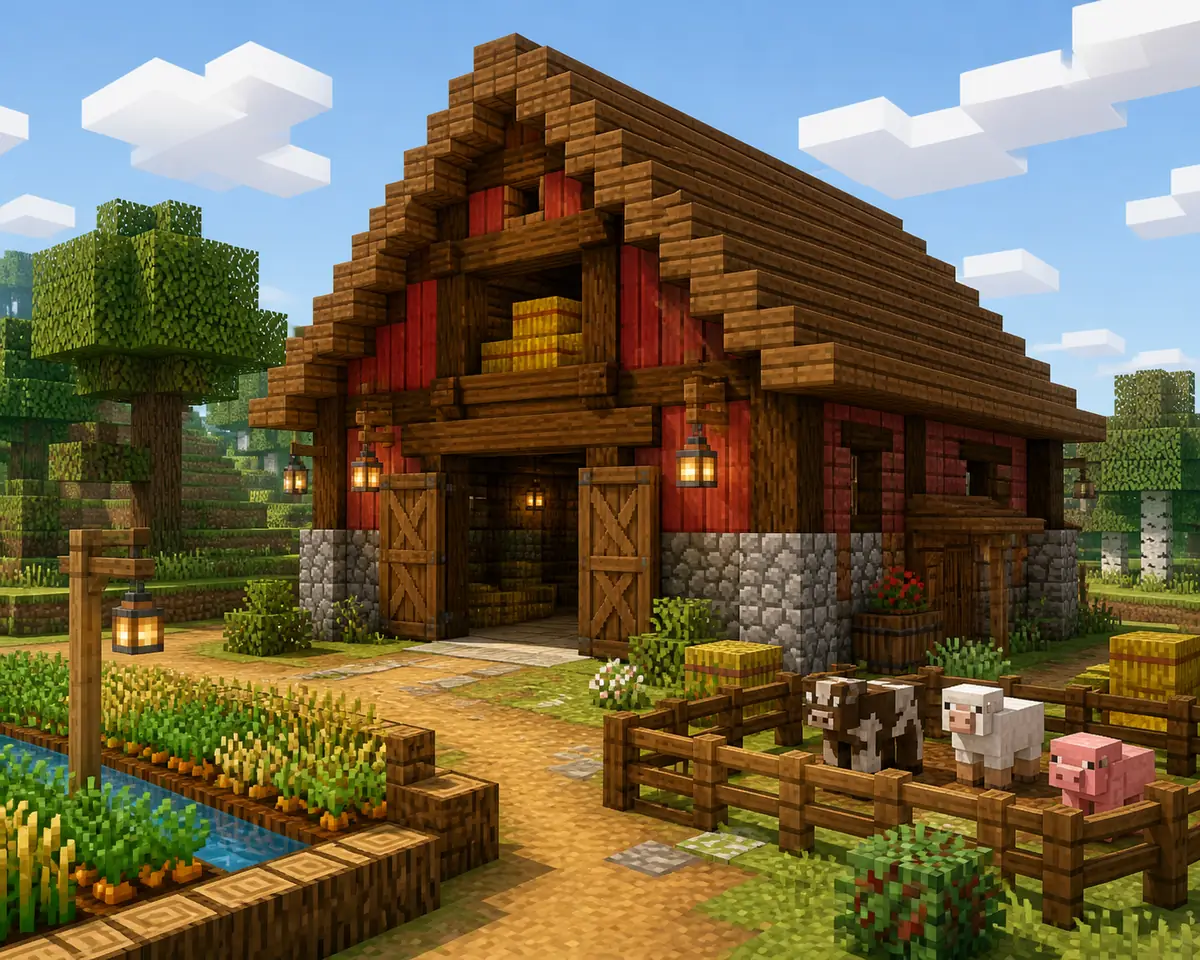
A reliable barn formula
- Choose the animal or farm job before choosing the facade.
- Reserve a central aisle or front service lane for movement.
- Keep stalls 3–4 blocks deep and avoid blocking the doors.
- Use a low-contrast foundation so the roof and timber frame stay readable.
- Connect the barn to a path, paddock, water source and crop area.
What makes a Minecraft barn read well
A recognizable barn has a few visual signals: a tall roof, a wide opening, repeated timber bays, a practical lower wall and evidence of farm work around it. You do not need to copy a real-world barn exactly. You need enough repetition for the eye to understand the building at a distance, plus enough variation that the facade does not become a flat rectangle.
The official Minecraft building archive is useful when you want to study the relationship between a small farm structure and its surrounding path, crops or animal enclosure. Treat those examples as references for function and atmosphere, not as a reason to copy every block.
For a first-party example of a compact farm structure, see Minecraft's working chicken coop article .
In your own build, repeat the same structural rhythm on the roof, wall and yard. For example, place a log post every three or four blocks, align the upper loft opening with the main door, and echo the roof trim in the fence gates. This gives the barn a visual grammar without requiring an enormous palette.
Scale matters as much as detail. A 7×9 barn can be charming beside a starter house, while a 15×21 barn needs a longer approach path, more surrounding fields and a stronger roof silhouette. If the building grows but the yard stays tiny, the farm starts to feel like a model placed on grass.
If your build already has a house, use its roof pitch and foundation color as constraints. The barn should belong to the same settlement while still being easy to identify from the path.
For the broader house footprint and roof relationship, pair this guide with the Minecraft house design guide .
Block palettes for different barn moods
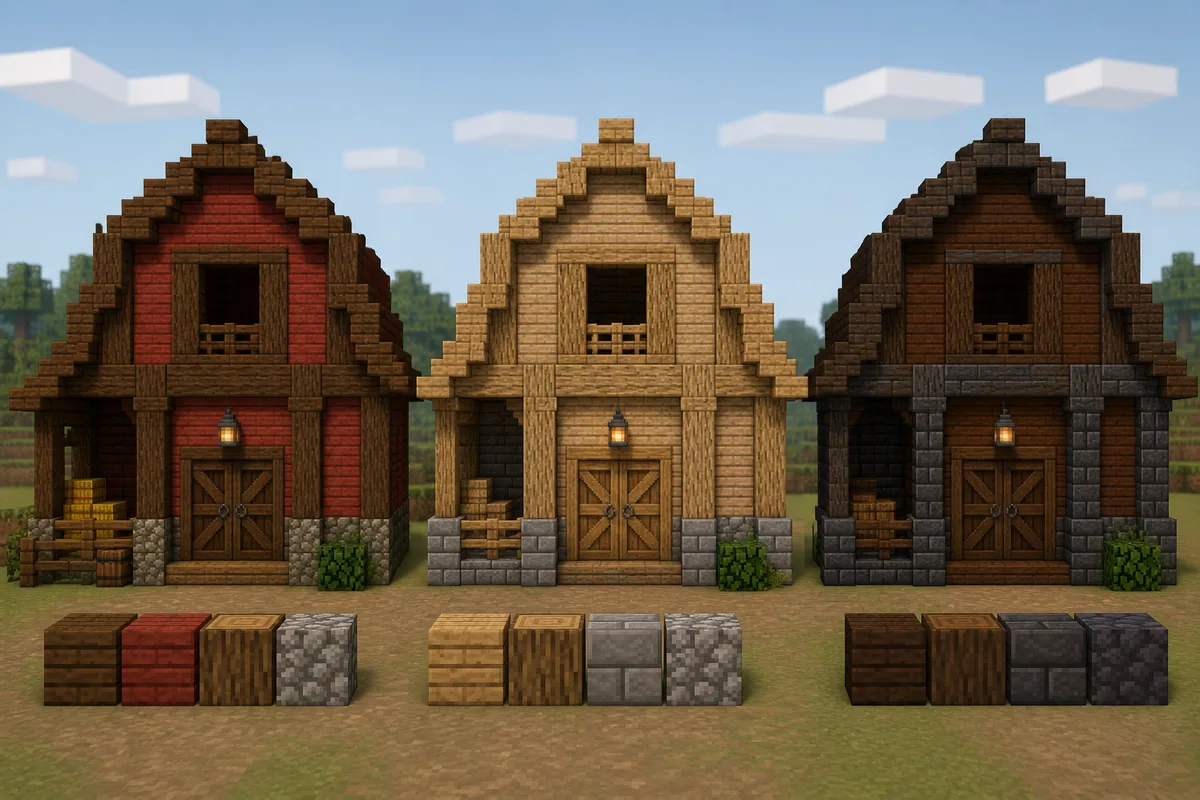
Start with a four-part palette: structure, infill, foundation and accent. The table below keeps the combinations narrow enough to gather in survival while leaving room for a controlled gradient on the roof or lower wall.
| Barn mood | Suggested sequence | Where to use it |
|---|---|---|
| Classic farm | Spruce logs → spruce planks → red planks → cobblestone | Warm walls, red gable, gray foundation and hay-yard accents. |
| Bright meadow | Oak logs → stripped oak → birch planks → stone bricks | Open fields, flower farms and lighter village edges. |
| Dark forest | Dark oak logs → dark oak planks → mud bricks → deepslate | Spruce forests, ravines and moody survival bases. |
| Mountain barn | Spruce → tuff → cobbled deepslate → stone | Hillside farms where the foundation should blend into rock. |
| Coastal stable | Stripped oak → pale oak → calcite → weathered copper | Horse routes, docks and windy open terrain. |
| Fantasy ranch | Dark oak → crimson planks → blackstone → gilded accent | Nether-themed ranches or high-contrast adventure areas. |
10 Minecraft barn layouts and placement ideas
The best Minecraft barn designs are not ten unrelated facades. They are ten ways to organize the same useful pieces. Pick a layout based on the land first: a flat starter farm wants a compact rectangle, a hillside wants a split level, and a large decorative estate can support a longer courtyard plan.
Before building the final wall, mark the doors, aisle and fence line with temporary blocks. Walk the route while holding food, breeding items or a lead. If you cannot enter, feed an animal and return to storage without squeezing around a post, the layout needs to change before decoration begins.
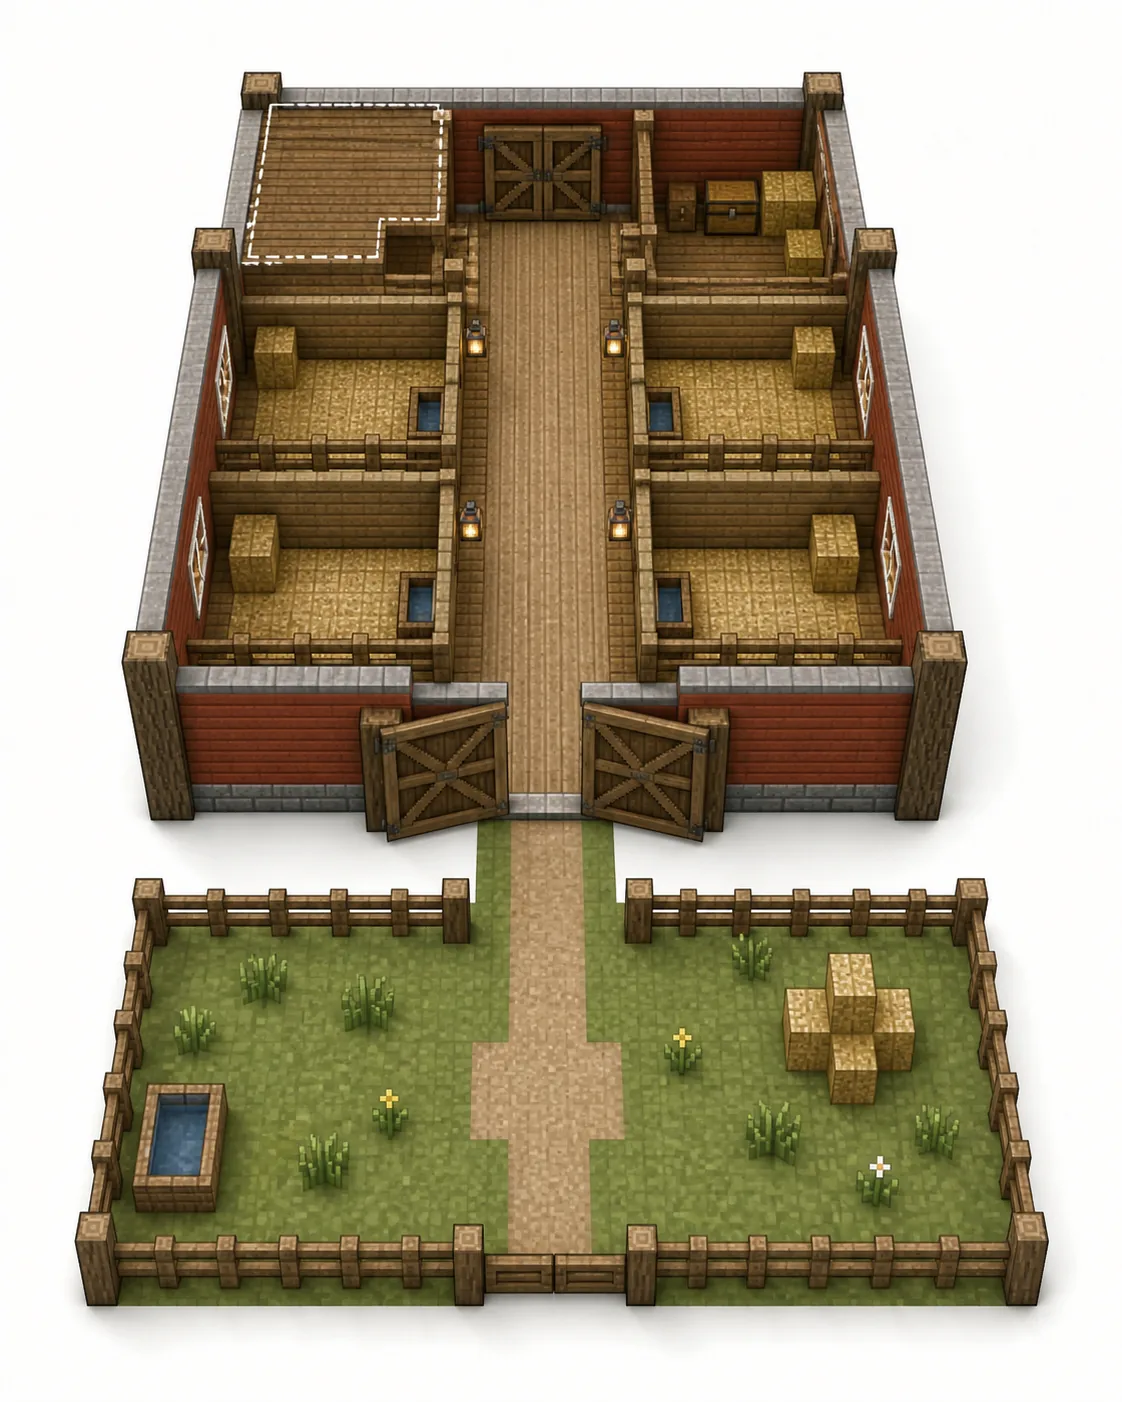
The layout illustration below shows a central aisle with four stalls, storage at the rear and a paddock connected to the entrance. It is deliberately modular: remove one stall for a smaller barn, or extend the side bays without changing the roof logic.
1. Compact starter barn
Use a 7×9 footprint with two opposing stalls, a single wide door and a small hay loft. It fits beside a first wheat field and can expand by adding another bay.
2. Long aisle barn
Build an 11×21 rectangle with repeated posts and stalls on both sides. Keep the aisle two blocks wide so the rhythm remains visible and useful.
3. Horse stable with tack room
Put horse stalls along one wall and a narrow chest, barrel and armor-stand zone along the other. A covered path keeps the stable connected to roads.
4. Split-level hillside barn
Let the lower level open into the hill for storage while the upper level faces the pasture. Use retaining walls to make the slope look intentional.
5. Courtyard barn
Place two smaller wings around a fenced yard. The courtyard becomes the working center and hides the rear service doors from the main approach.
6. Barn with attached silo
Add a narrow tower one or two blocks behind the main gable. Keep the silo lower than the roof peak unless the build is meant to be a landmark.
7. Riverbank animal barn
Align one side with a water channel, but raise the foundation above flood-prone ground. Use a short bridge or path to connect the paddock.
8. Forest-edge barn
Use darker logs and a low roof, then clear only a small working yard. The contrast between dense trees and warm lantern light creates the atmosphere.
9. Market farm barn
Add a front awning, produce stalls and a side loading door. This works well near a village road where the barn needs a public face.
10. Large estate barn
Combine a central hall, side wings, loft windows and an outer paddock. Repeat the house palette but reserve one accent color for the barn doors or gable.
Survival-friendly barn planning
A survival barn should improve your routine, not become another project that consumes every rare block. Build the functional shell first: foundation, doors, fence gates, water, lighting and storage. Add roof layers, shutters and decorative beams after you can safely use the animal area at night.
Keep a chest or barrel near the entrance for food, leads, breeding materials and spare fence pieces. Put bulk hay or crop storage at the rear so the front remains readable. If the barn supports multiple animals, use signs or colored carpet only after the traffic pattern works; organization should not reduce the width of the aisle.
For material planning, count the repeated modules rather than every decorative block. One stall usually needs a fence line, a gate, a light and a feed or water point. Multiply that module by the number of animals, then reserve extra wood for the roof trim and future expansion.
Common Minecraft barn mistakes
Making the barn a decorated box
A flat rectangle with a tiny door loses the barn silhouette. Raise the roof, frame the bays and give the entrance a working width.
Adding stalls before checking the aisle
Fence posts and water troughs steal movement space quickly. Walk the full breeding and storage loop before adding small details.
Using every wood color at once
Choose one dominant wood and one contrast family. A third accent is enough for doors, trim or lantern supports.
Ignoring the approach path
The barn can look correct from one angle but disconnected from the settlement. Extend the path, fence and crop edge so the building has a reason to sit there.
Making the roof too shallow
A barn often depends on its roof for identity. Use stairs and slabs to create a clear pitch, then soften the eaves with a restrained trim.
Lighting only the outside
Check the loft, corners, rear storage and paddock at night. Hidden dark pockets are both a gameplay problem and a visual break in the farm rhythm.
Minecraft barn ideas FAQ
What is a good size for a Minecraft barn?
A 7×9 or 9×13 footprint works well for a small survival barn. Larger 11×15 or 11×21 layouts are easier to divide into several stalls, storage zones and a central aisle.
What blocks look good for a Minecraft barn?
Spruce, oak, dark oak, red planks, mud bricks, cobblestone, stone bricks, tuff and deepslate all work. Use one main wood, one roof or infill color and one foundation material rather than mixing every strong color.
How do I build a Minecraft barn for animals?
Start with a clear entrance, a two-block-wide aisle, stalls three or four blocks deep, safe lighting and a nearby paddock. Keep food, leads and storage close to the door so the barn supports the breeding loop.
Should a Minecraft barn have a loft?
A loft is useful for hay, barrels and silhouette. Leave a ladder or stair route that does not block the animal stalls, and use the upper opening as a focal point on the gable.
How can I make a small barn look detailed?
Use repeated timber bays, a strong roof edge, one foundation band, shutters or trapdoors and a short path to the paddock. Small changes in depth usually add more detail than extra block colors.
Can I use a barn design in a hillside farm?
Yes. Put storage into the lower side of the hill, face the stalls toward the pasture and use retaining walls to explain the slope. A split-level plan often feels more natural than flattening the entire site.
How do I connect a barn to a Minecraft house?
Repeat one material from the house, align the approach path and keep the barn slightly simpler than the main building. The house can remain the focal point while the barn anchors the farm activity around it.
Test the barn palette before you build
Try the wood, roof and foundation sequence in the Minecraft Gradient Generator, then compare it with the surrounding house, path and field blocks.
Open the Minecraft Gradient Generator