Quick Answer: Best Minecraft Gradient Roof Method
The safest Minecraft gradient roof method is to choose one main roof family, then shift brightness from the ridge to the eaves. For a wooden roof, try stripped spruce -> spruce planks -> spruce stairs -> dark oak stairs -> dark oak trapdoors. For an aged roof, add moss, mud bricks or cracked blocks only where rain, shade or damage would naturally collect.
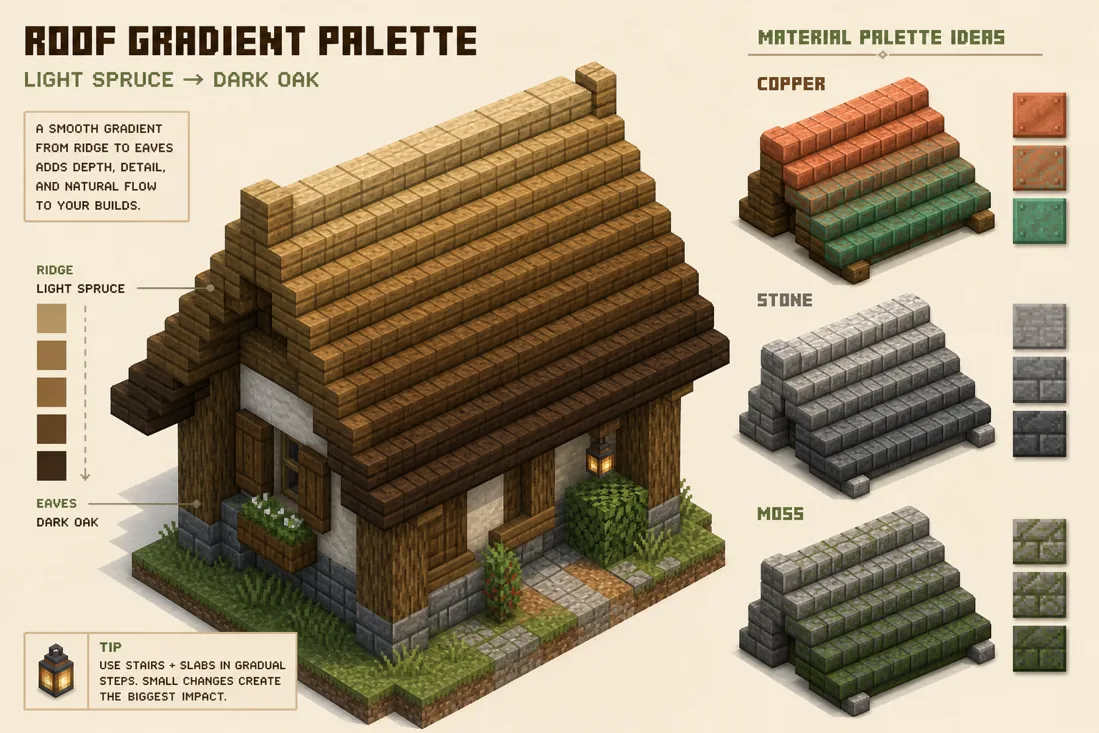
A roof gradient works best when it follows the roof shape. Keep lighter blocks on the upper ridge and sun-facing slope, place the middle material across most of the roof, then use darker or rougher blocks under overhangs, dormers, chimneys and lower corners. This gives the roof depth without turning it into random noise.
Reliable starter rules
- Pick one material family before adding accents.
- Use the main roof block for about 60% of the surface.
- Put transition blocks on slope changes, dormers and edges.
- Reserve the darkest blocks for eaves, chimneys and shadowed undersides.
- Use moss, copper aging or cracked blocks only where the story of the build supports them.
- Test the roof from street level, not only from above.
Why a Minecraft Roof Gradient Works
Roofs are one of the biggest visible surfaces on many Minecraft builds. A single flat material can look clean, but it often makes a cabin, village house or tower feel unfinished. A controlled Minecraft roof gradient creates shade, age and direction while keeping the silhouette readable.
The key is material logic. Wood roofs should stay mostly within wood and weathered wood tones. Copper roofs should use oxidation stages carefully. Stone roofs should move through related stone, tuff, brick or slate blocks. When the materials share a believable purpose, the gradient looks designed instead of patched together.
For copper roof palettes, check the official Minecraft copper block overview for oxidation behavior and waxed copper context.
Viewing angle matters. Players usually see a roof from the ground, from a nearby hill or while flying around the build. A pattern that looks smooth from above may become invisible from street level. Build a small roof slice first, then inspect it at the same distance and lighting as the final structure.
If you need a starting sequence before placing blocks, open the Minecraft Gradient Generator and compare candidate blocks, then use this guide to decide where each block belongs on the roof.
7 Minecraft Roof Gradient Palettes
Use these Minecraft roof palette ideas as starting points. Swap blocks for biome, survival availability and the scale of your roof before committing to a large build.
| Roof Style | Gradient Sequence | Best Placement |
|---|---|---|
| Spruce cabin roof | stripped spruce -> spruce planks -> spruce stairs -> dark oak stairs -> dark oak trapdoors | Lighter spruce near the ridge, dark oak under eaves and dormer shadows. |
| Aged village roof | oak planks -> spruce planks -> mud bricks -> packed mud -> moss carpet | Keep mud and moss near lower edges, leaks, chimneys and shaded corners. |
| Copper roof | copper blocks -> exposed copper -> weathered copper -> oxidized copper | Use oxidation as a directional gradient or patch it near older roof sections. |
| Castle slate roof | stone bricks -> tuff bricks -> deepslate tiles -> polished deepslate -> blackstone | Use the dark end at steep lower slopes, towers and heavy shadow lines. |
| Desert roof | smooth sandstone -> sandstone -> cut sandstone -> terracotta -> orange terracotta | Keep warm accents on sun-baked trim and roof caps, not across every block. |
| Nether roof | crimson planks -> nether bricks -> red nether bricks -> blackstone -> polished blackstone | Darken toward supports, spires and the underside of overhangs. |
| Fantasy moss roof | spruce planks -> moss block -> moss carpet -> azalea leaves -> dark oak | Cluster greenery on low, damp and shaded areas so it feels grown in. |
How to Place a Roof Gradient Without Random Noise
Start with the roof silhouette before choosing every accent. The outline, pitch, overhang and dormers decide where shadows fall. Place the main roof block first so the structure reads clearly, then add transition blocks only where the roof changes plane or depth.
Use a 60/30/10 split for most roofs. About 60% should be the main roof material, 30% should be a close transition block, and 10% should be the strongest accent. On a spruce roof, spruce stairs can carry the main surface, darker wood can mark eaves, and trapdoors or slabs can add shadow detail.
Avoid straight stripes unless the build is intentionally stylized. Roof gradients usually look better as shaped clusters: darker blocks under overhangs, weathered blocks around chimneys, moss near damp edges and lighter blocks where sunlight would hit. The pattern should explain the roof, not distract from it.
Scale changes the recipe. A small starter house may only need three roof blocks. A large hall, castle or fantasy tower can use five to seven blocks because the surface has enough room for a readable transition.
If the roof gradient is hard to see from the ground, move contrast to the silhouette: eaves, dormers, chimneys, ridge caps and the first two stair rows above the wall. Subtle mid-slope variation is useful up close, but the SEO intent behind a Minecraft roof gradient is usually a visible roof palette players can copy from normal viewing distance.
For a green roof gradient, keep the roof structure readable first: use oxidized copper or dark prismarine as the main field, mix moss blocks and weathered copper around damp edges, then add moss carpet, leaves or warped accents only in small clusters. For a red roof gradient, make brick or red terracotta the main material and reserve dark oak, mud bricks or nether bricks for eaves, chimneys and shadowed lower rows.
For cabins
Use wood tones first, then add dark accents below eaves and around dormers.
For castles
Slate, deepslate, tuff and blackstone work well when the roof needs a heavier silhouette.
For fantasy builds
Use moss, leaves, copper or bright accents in clusters tied to weather, magic or age.
Survival-Friendly Minecraft Roof Gradient
In survival mode, start with blocks you can gather in volume. Spruce, oak, dark oak, cobblestone, stone bricks, mud bricks and copper are usually easier to scale than rare decorative blocks. Save expensive accents for the ridge line, windows, chimneys and visible corners.
A practical early-game roof palette is oak planks -> spruce planks -> spruce stairs -> dark oak stairs. If dark oak is not available, use stripped spruce, spruce trapdoors or campfire smoke details instead of forcing a block that does not fit your biome.
For copper roofs, build the shape first and let oxidation become part of the gradient over time, or wax selected sections to freeze a planned color step. Do not mix every copper stage evenly unless the roof is meant to look intentionally patterned.
Common Minecraft Roof Gradient Mistakes
Using too many unrelated colors
A roof can include contrast, but it still needs a material story. Random red, blue, green and black blocks usually weaken the build unless the whole structure is highly stylized.
Putting moss everywhere
Moss is most convincing near damp, shaded or neglected areas. Spread it evenly and the roof stops looking weathered; it starts looking like a green checkerboard.
Ignoring stairs, slabs and trapdoors
Roof gradients are not only full blocks. Stairs, slabs and trapdoors shape shadows, trim and thickness. They often make the gradient feel more natural than color changes alone.
Checking only from above
Most players see roofs from below or at an angle. Always inspect the gradient from the path, courtyard or entrance where the build will actually be viewed.
Making the roof gradient visible only from above
Most players see roofs from street level or nearby terrain. Test the gradient from those angles and keep the strongest contrast near eaves, dormers and chimneys where it remains visible.
FAQ
What is the best Minecraft gradient roof palette?
For most wooden builds, stripped spruce, spruce planks, spruce stairs, dark oak stairs and dark oak trapdoors create a reliable light-to-dark roof gradient. Adjust the palette for biome and build style.
How many blocks should a Minecraft roof gradient use?
Small roofs usually need three to four blocks. Large roofs, castles and towers can use five to seven blocks because the surface is wide enough for a smoother transition.
Can copper make a good Minecraft roof gradient?
Yes. Copper, exposed copper, weathered copper and oxidized copper create a strong roof gradient. Wax blocks if you want to lock a specific oxidation stage.
Where should the darkest roof blocks go?
Dark roof blocks usually work best under eaves, around chimneys, near dormers, at lower edges and on shadowed slopes. Avoid scattering them evenly across the whole roof.
Is a Minecraft roof gradient different from a wall gradient?
Yes. A wall gradient often follows height, cracks or terrain. A roof gradient should follow slope, light, overhangs, weathering and the way players view the roof from below.
What is the best red roof gradient in Minecraft?
A strong red roof gradient uses warmer blocks near highlights and darker blocks near the eaves: red terracotta, brick stairs, mud bricks and dark oak or mangrove accents can work if the material story matches the build.
How do I make a Minecraft roof gradient visible from the ground?
Put the strongest contrast on eaves, dormers, chimneys, ridge caps and lower stair rows. Keep the middle slope calmer so the roof shape stays readable from the path or courtyard.
How do I make a green roof gradient in Minecraft?
Use oxidized or weathered copper, dark prismarine, moss blocks and small moss-carpet or leaf accents. Keep one material dominant, place greener blocks near damp edges and chimneys, and avoid covering the entire slope with random foliage.
Plan the Roof Palette Before You Build the Whole House
Use these roof palettes as a starting point, then test a small slope in your world. For faster block ordering, compare candidate materials in the generator before placing the final roof.
Use the Minecraft Gradient Generator